Sometimes, publishing new blogposts is not about covering a new fancy technique, a new way of AV evasion or smart ways to detect malware. Sometimes, the only reason to write a blogpost is to introduce an idea into the world and hoping to provoke reactions such as “Why would you do that!?”, “That is cool!” or “That sounds overly complex and complicated, love it” (looking at you @_dirkjan) and last but not least, to satisfy your own curiosity. This is such a blogpost, where I dive into JSON Web Tokens, Azure Key Vaults and compound identities. For fun and for understanding their inner workings and possibilities.
The Why
Beginning of March 2022, Orca Security published a blogpost detailing the Autowarp vulnerability that they discovered. To find out what this vulnerability entails, read their blogpost: https://orca.security/resources/blog/autowarp-microsoft-azure-automation-service-vulnerability/
In short; this vulnerability allowed users to retrieve JSON Web Tokens (JWT) belonging to identities in other tenants. These tokens are part of the authentication process in Azure and other people having access to identities in your own tenant is a great way to have your own tenant completely compromised. The vulnerability emerged when using Azure Automation and having the managed identity feature enabled. That got me thinking; what if I wanted to use JWT’s without the managed identity feature? How does that even work? This curiosity sucked me into the ever amazing world of tokens, signing and Azure. This blogpost requires prior knowledge about applications, permissions, Graph API etc., since we will deep dive into a fair amount of technical challenges.
The How
Tokens (Access token, JWTs) can be used for authentication when using the Microsoft Graph API or any other service. To interact with the Graph API, an Enterprise Application needs to be created. This application has either been granted explicit permissions (Application permissions) on Azure resources or can interact with Azure resources on behalf of a user (Delegated permissions).
We focus on application permissions for the most part. The examples below are written in PowerShell and uses native functionality as well as functions from the following modules:
- MSAL.PS;
- AzureAD.
The AzureAD module is used to provide extra information on how to request tokens using the Azure Active Directory Authentication Library (ADAL) library, although this is not the recommended approach and is actively discouraged by Microsoft. There are still numerous examples found on the internet utilizing this method, which is why this method is included in the examples below. This also has an added benefit: it also provides examples to migrate to a supported version of the Authentication Library.
The examples below are shortened and focus on the main functionality to enhance readability. Full examples and details can be found on our GitHub page: https://github.com/huntandhackett/accesstokens_are_fun
In that repository, a Dockerfile is provided that installs PowerShell Core and the modules mentioned above, but a few caveats:
- ADAL does not work on .NET Core;
- Using Docker might not deliver the most stable experience imaginable.
Using client secrets
Getting access tokens using client secrets can be done by either invoking ADAL.NET, MSAL or by doing the needed POST requests yourself. This seems to be the most common way to acquire access tokens for services with Application permissions configured.
# Install-Module MSAL.PS
# Install-Module AzureAD

$appID        = ''
$secret       = ''
$sSecret      = (ConvertTo-SecureString $secret -AsPlainText -Force)
$tenantID     = ''

######################
##        MSAL      ##
######################
Import-Module MSAL.PS
$msalToken = Get-MsalToken -ClientId $appID -ClientSecret $sSecret `
                -TenantId $tenantID -Scope 'https://graph.microsoft.com/.default'

Write-Output "[+] Got token using MSAL and client secret: $($msalToken.AccessToken)"

######################
##        ADAL      ##
######################
if ($PSVersionTable.PSEdition -eq 'Core') {
    Write-Error -Message "This does not work on .NET Core"
} else {

    $aZADmodulePath = (Get-Module AzureAD -ListAvailable).ModuleBase
    $azADdll        = Join-Path -Path $aZADmodulePath -ChildPath "Microsoft.IdentityModel.Clients.ActiveDirectory.dll"
    [void]([System.Reflection.Assembly]::LoadFrom($azADdll))

    $authority        = "https://login.microsoftonline.com/$($tenantID)"
    $authContext      = ([Microsoft.IdentityModel.Clients.ActiveDirectory.AuthenticationContext]::new($authority))
    $clientCredential = New-Object  -TypeName Microsoft.IdentityModel.Clients.ActiveDirectory.ClientCredential `
                                    -ArgumentList ($appId, $secret)

    $authResult = $authContext.AcquireTokenAsync('https://graph.microsoft.com', $clientCredential)
    $authResult.Wait()
    $adalToken = $authResult.Result

    Write-Output "[+] Got token using ADAL and client secret: $($adalToken.AccessToken)"
}


##########################
##      Using REST       #
##########################
$uri      = "https://login.microsoftonline.com/$($tenantID)/oauth2/v2.0/token"
$headers  = @{'Content-Type' = 'application/x-www-form-urlencoded'}
$response = Invoke-RestMethod -Uri $uri -UseBasicParsing -Method POST -Headers $headers -Body ([ordered]@{
    'client_id'     = $appID
    'scope'         = 'https://graph.microsoft.com/.default'
    'client_secret' = $secret
    'grant_type'    = 'client_credentials'
})

$restToken = $response
Write-Output "[+] Got token using REST and client secret: $($restToken.access_token)"
Using client certificates with MSAL and ADAL
Another way to obtain access tokens is by using client certificates. This process is slightly different because now we have to proof that we own the private key of the public key that has been configured on the enterprise application. By using ADAL or MSAL, this is fairly easy.
function Import-AppCert {
}

$appID          = ''
$tenantID       = ''
$certThumbprint = ''


# Import client certificate
$clientCertificate = Import-AppCert

######################
##        MSAL      ##
######################
Import-Module MSAL.PS
$msalToken = Get-MsalToken -Scope 'https://graph.microsoft.com/.default' -ClientId $appID -ClientCertificate $clientCertificate -TenantId $tenantID
Write-Output "[+] Got token using MSAL and client certificate: $($msalToken.AccessToken)"


######################
##        ADAL      ##
######################
if ($PSVersionTable.PSEdition -eq 'Core') {
    Write-Error -Message "This does not work on .NET Core"
} else {

    $aZADmodulePath = (Get-Module AzureAD -ListAvailable).ModuleBase
    $azADdll        = Join-Path -Path $aZADmodulePath -ChildPath "Microsoft.IdentityModel.Clients.ActiveDirectory.dll"
    [void]([System.Reflection.Assembly]::LoadFrom($azADdll))

    $authority   = "https://login.microsoftonline.com/$($tenantID)"
    $authContext = ([Microsoft.IdentityModel.Clients.ActiveDirectory.AuthenticationContext]::new($authority))
    $certificateCredential = New-Object -TypeName Microsoft.IdentityModel.Clients.ActiveDirectory.ClientAssertionCertificate `
                                        -ArgumentList ($appId, $clientCertificate)

    $authResult = $authContext.AcquireTokenAsync('https://graph.microsoft.com', $certificateCredential)
    $authResult.Wait()
    $adalToken = $authResult.Result

    Write-Output "[+] Got token using ADAL and client certificate: $($adalToken.AccessToken)"
}
This is great stuff, but we don't quite know based on what information we were authenticated. Sure, we used a private key in the process to prove our identity but there's plenty of room for unknowingness still. Let's continue and find out what we need to do to verify our identity using a public/private keypair.
Manually request token with certificate
Requesting tokens manually requires us to know how to construct a JWT token. There are various posts[1] online that details on how that works, so we focus on the practical implementation only.
function Import-AppCert {
}

$appID          = ''
$tenantID       = ''
$certThumbprint = ''

# Import client certificate
$clientCertificate = Import-AppCert

$audience = "https://login.microsoftonline.com/$($tenantID)/oauth2/token"

# Create a base64 hash of the certificate. The Base64 encoded string must by urlencoded
$CertificateBase64Hash = [System.Convert]::ToBase64String($clientCertificate.GetCertHash())
$CertificateBase64Hash = $CertificateBase64Hash -replace '\+','-' -replace '/','_' -replace '='

# JWT request should be valid for max 2 minutes.
$StartDate             = (Get-Date "1970-01-01T00:00:00Z" ).ToUniversalTime()
$JWTExpirationTimeSpan = (New-TimeSpan -Start $StartDate -End (Get-Date).ToUniversalTime().AddMinutes(2)).TotalSeconds
$JWTExpiration         = [math]::Round($JWTExpirationTimeSpan,0)

# Create a NotBefore timestamp.
$NotBeforeExpirationTimeSpan = (New-TimeSpan -Start $StartDate -End ((Get-Date).ToUniversalTime())).TotalSeconds
$NotBefore                   = [math]::Round($NotBeforeExpirationTimeSpan,0)

# Create JWT header
$jwtHeader = @{
    'alg' = "RS256"                   # Use RSA encryption and SHA256 as hashing algorithm
    'typ' = "JWT"                     # We want a JWT
    'x5t' = $CertificateBase64Hash    # Webencoded Base64 of the hash of our certificate
}

# Create the payload
$jwtPayLoad = @{
    'aud' = $audience           # Points to oauth token request endpoint for your tenant
    'exp' = $JWTExpiration      # Expiration of JWT request
    'iss' = $appID              # The AppID for which we request a token for
    'jti' = [guid]::NewGuid()   # Random GUID
    'nbf' = $NotBefore          # This should not be used before this timestamp
    'sub' = $appID              # Subject
}

# Convert header and payload to json and to base64
$jwtHeaderBytes  = [System.Text.Encoding]::UTF8.GetBytes(($jwtHeader | ConvertTo-Json))
$jwtPayloadBytes = [System.Text.Encoding]::UTF8.GetBytes(($jwtPayLoad | ConvertTo-Json))
$b64JwtHeader    = [System.Convert]::ToBase64String($jwtHeaderBytes)
$b64JwtPayload   = [System.Convert]::ToBase64String($jwtPayloadBytes)

# Concat header and payload to create an unsigned JWT
$unsignedJwt      = $b64JwtHeader + "." + $b64JwtPayload
$unsignedJwtBytes = [System.Text.Encoding]::UTF8.GetBytes($unsignedJwt)

# Configure RSA padding and hashing algorithm, load private key of certificate and use it to sign the unsigned JWT
$privateKey    = ([System.Security.Cryptography.X509Certificates.RSACertificateExtensions]::GetRSAPrivateKey($clientCertificate))
$padding       = [Security.Cryptography.RSASignaturePadding]::Pkcs1
$hashAlgorithm = [Security.Cryptography.HashAlgorithmName]::SHA256
$signedData    = $privateKey.SignData($unsignedJwtBytes, $hashAlgorithm, $padding)

# Create a signed JWT by adding the signature to the unsigned JWT
$signature = [Convert]::ToBase64String($signedData) -replace '\+','-' -replace '/','_' -replace '='
$signedJWT = $unsignedJwt + "." + $signature

# Request an access token using the signed JWT
$uri      = "https://login.microsoftonline.com/$($tenantID)/oauth2/v2.0/token"
$headers  = @{'Content-Type' = 'application/x-www-form-urlencoded'}
$response = Invoke-RestMethod -Uri $uri -UseBasicParsing -Method POST -Headers $headers -Body ([ordered]@{
    'client_id'             = $appID
    'client_assertion'      = $signedJWT
    'client_assertion_type' = 'urn:ietf:params:oauth:client-assertion-type:jwt-bearer'
    'scope'                 = 'https://graph.microsoft.com/.default'
    'grant_type'            = 'client_credentials'
})

Write-Output "[+] Got token using REST and client certificate: $($response.access_token)"
With the example above, we constructed the JWT ourselves and signed it with the private key. Since the application has been configured with the public key, our JWT can be successfully verified, resulting in a beautiful access token.
Still here? Great! Let's continue.
Signing JWTs with Azure Key Vault
We can now sign our own JWTs using a private key that we own. While using certificates is considered more secure than using plain text passwords or client secrets, there's still a risk that the certificate gets stolen or abused. Azure Key Vault supports certificates and you can even configure certificates as non-exportable. That means that cryptographic operations are done inside the key vault and the private key never leaves the vault. If Azure Key Vault also supports signing data with private keys, it should be possible to sign JWTs using a private key that is stored in Azure Key Vault, right? Let's find out! Create a new certificate in the Azure Key Vault and add the public key to your Enterprise Application. You can also import a previously created private key into the vault, but from a security perspective it is arguably better to have your private key only stored in one protected place.
We use most of the previous code and slight modify it to suit our needs:
- Create an unsigned JWT using the certificate hash and appID;
- Create a SHA256 hash of the unsigned JWT;
- Use the sign operation of the key vault to sign the hash;
- Add the signature to the unsigned JWT, making it a signed one;
- Request access token with the signed JWT.
However, when doing this we encounter a catch-22:
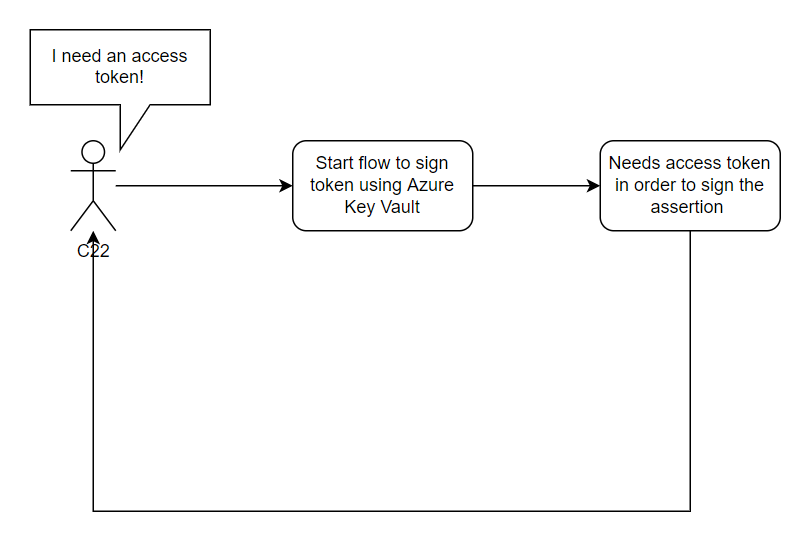
Catching the 22
There is an issue with how the JWTs would be signed in the example above. We are invoking the sign operation to create a signed JWT to request an access token, but in order to do that we need a signed JWT. The web interface for Azure Key Vaults does not support signing data with certificates in the store. And even if it was supported, that means manual interaction which is not ideal either.
Lets assume the following:
- Name of the Enterprise Application that has a certificate stored in an Azure Key Vault:
App-WithPermissions - Permission configured for Enterprise Application
App-WithPermissions:Mail.Send
- Name of the user that wants to utilize the permissions of this app:
HunterMalicia
A solution for this, would be creating another Enterprise Application - App-Proxy. In Azure Key Vault, App-Proxy would be granted the following permissions:
- Certificate:
GetList
- Keys:
GetSign
Other than that, no other permission is granted to the App-Proxy Enterprise Application. These set of permissions allows the application to interact with certificates and keys in the keyvault.
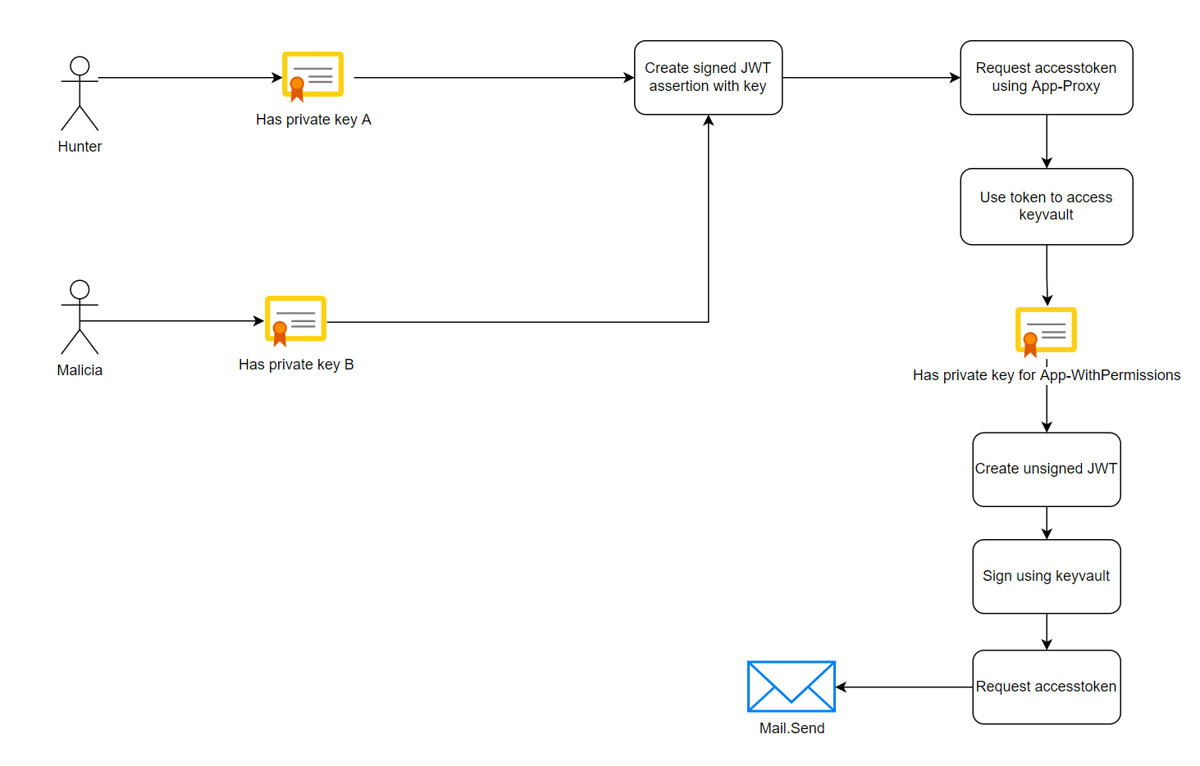
Next, create a certificate keypair and add the public key to the App-Proxy application. The private key is given to the user Hunter. With his private key, user Hunter can create an access token for the App-Proxy application. The App-Proxy application has been granted the permission to use the sign operation on the private key of which the public key was bound to the App-WithPermissions Enterprise Application.
This means that via App-Proxy, user Hunter can create an access token for the App-WithPermissions Enterprise Application and may then utilize the permissions that this app has been given. If you want to give another user - Malicia for example - also access, you can create a new keypair and add the new public key to the App-Proxy as well. By utilizing their own keys, they benefit the same kind of access. This also allows you to revoke access to App-WithPermissions for user Malicia without revoking the certificate of user Hunter or revoke the certificate of the App-WithPermissions Enterprise Application.
The entire flow would looks something like the following:
To do this in code:
function Import-AppCert {
}

function New-AccessToken ($clientCertificate, $tenantID, $appID, $scope='https://graph.microsoft.com/.default') {
}

function Get-AKVCertificate($kvURI, $proxyAppToken, $keyName) {
}

$proxyAppId      = ''
$permissionAppID = ''
$certThumbprint  = ''
$tenantID        = ''

# URL to keyvault
$kvURI   = 'https://xxx.vault.azure.net'
$keyName = 'App-WithPermission'

# The target audience for the token for Azure Keyvault is different than we'd normally use for MSGraph
$kvScope = 'https://vault.azure.net/.default'

#########################################################
##             Get token for App-Proxy                  #
#########################################################
$clientCert = Import-AppCert
$proxyAppToken = New-AccessToken -clientCertificate $clientCert -tenantID $tenantID -appID $proxyAppId -scope $kvScope

#########################################################
##        Use App-Proxy token to enumerate key vault    #
#########################################################
$AKVCertificate = Get-AKVCertificate -kvURI $kvURI -proxyAppToken $proxyAppToken -keyName $keyName

# Create a new assertion with all the information we received from the keyvault. This assertion is then signed and sent to
# the keyvault to sign the hash. The hash is added to the unsigned assertion, making it a signed one.
# The signed assertion will be used to request a valid access token
$audience = "https://login.microsoftonline.com/$($tenantID)/oauth2/token"

# JWT request should be valid for max 2 minutes.
$StartDate             = (Get-Date "1970-01-01T00:00:00Z" ).ToUniversalTime()
$JWTExpirationTimeSpan = (New-TimeSpan -Start $StartDate -End (Get-Date).ToUniversalTime().AddMinutes(2)).TotalSeconds
$JWTExpiration         = [math]::Round($JWTExpirationTimeSpan,0)

# Create a NotBefore timestamp.
$NotBeforeExpirationTimeSpan = (New-TimeSpan -Start $StartDate -End ((Get-Date).ToUniversalTime())).TotalSeconds
$NotBefore                   = [math]::Round($NotBeforeExpirationTimeSpan,0)

# Create JWT header
$jwtHeader = @{
    'alg' = "RS256"              # Use RSA encryption and SHA256 as hashing algorithm
    'typ' = "JWT"                # We want a JWT
    'x5t' = $AKVCertificate.x5t  # The pubkey hash we received from Azure Key Vault
}

# Create the payload
$jwtPayLoad = @{
    'aud' = $audience           # Points to oauth token request endpoint for your tenant
    'exp' = $JWTExpiration      # Expiration of JWT request
    'iss' = $permissionAppID    # The AppID for which we request a token for
    'jti' = [guid]::NewGuid()   # Random GUID
    'nbf' = $NotBefore          # This should not be used before this timestamp
    'sub' = $permissionAppID    # Subject
}

# Convert header and payload to json and to base64
$jwtHeaderBytes  = [System.Text.Encoding]::UTF8.GetBytes(($jwtHeader | ConvertTo-Json))
$jwtPayloadBytes = [System.Text.Encoding]::UTF8.GetBytes(($jwtPayLoad | ConvertTo-Json))
$b64JwtHeader    = [System.Convert]::ToBase64String($jwtHeaderBytes)
$b64JwtPayload   = [System.Convert]::ToBase64String($jwtPayloadBytes)

# Concat header and payload to create an unsigned JWT and compute a Sha256 hash
$unsignedJwt      = $b64JwtHeader + "." + $b64JwtPayload
$unsignedJwtBytes = [System.Text.Encoding]::UTF8.GetBytes($unsignedJwt)
$hasher           = [System.Security.Cryptography.HashAlgorithm]::Create('sha256')
$jwtSha256Hash    = $hasher.ComputeHash($unsignedJwtBytes)
$jwtSha256HashB64 = [Convert]::ToBase64String($jwtSha256Hash) -replace '\+','-' -replace '/','_' -replace '='

# Sign the sha256 of the unsigned JWT using the certificate in Azure Key Vault
$uri      = "$($AKVCertificate.kid)/sign?api-version=7.3"
$headers  = @{
    'Authorization' = "Bearer $proxyAppToken"
    'Content-Type' = 'application/json'
}
$response = Invoke-RestMethod -Uri $uri -UseBasicParsing -Method POST -Headers $headers -Body (([ordered] @{
    'alg'   = 'RS256'
    'value' = $jwtSha256HashB64
}) | ConvertTo-Json)
$signature = $response.value

# Concat the signature to the unsigned JWT
$signedJWT = $unsignedJwt + "." + $signature

# Request an access token using the signed JWT
$uri      = "https://login.microsoftonline.com/$($tenantID)/oauth2/v2.0/token"
$headers  = @{'Content-Type' = 'application/x-www-form-urlencoded'}
$response = Invoke-RestMethod -Uri $uri -UseBasicParsing -Method POST -Headers $headers -Body ([ordered]@{
    'client_id'             = $permissionAppID
    'client_assertion'      = $signedJWT
    'client_assertion_type' = 'urn:ietf:params:oauth:client-assertion-type:jwt-bearer'
    'scope'                 = 'https://graph.microsoft.com/.default'
    'grant_type'            = 'client_credentials'
})

Write-Output "[+] Got token using REST, Azure Keyvault and client certificates: $($response.access_token)"
While this is cool, there is still room for improvement. By using this flow, all key operations are done by the App-Proxy Enterprise Application. There is no indication whether Hunter or Malicia initiated the key operation. Let's go deeper, play with compound identities and see if we can find a solution for this.
Going all the way
In doing so, lets assume the following:
- Name of the Enterprise Application that has a certificate stored in an Azure Key Vault:
App-WithPermissions - Permission configured for Enterprise Application
App-WithPermissions:Mail.Send
- Name of the users that wants to utilize the permissions of this app:
HunterMalicia
- Laptops with integrated TPM
- Centrally managed PKI
Use the PKI to issue a certificate to every involved user account. Configure the enrollment such that the private key is stored on the TPM (thus marking it as non-exportable). Next, create a new Enterprise Application - App-Proxy. Configure the App-Proxy:
- For every user involved, add their personal public key to the
App-ProxyEnterprise Application. Do note that there are limits on the amount of certificates that can be added. - Configure a
Redirect URI, such ashttp://localhost:9999
In the Azure Key Vault, configure the following permissions:
- Certificate:
GetList
- Keys:
GetSign
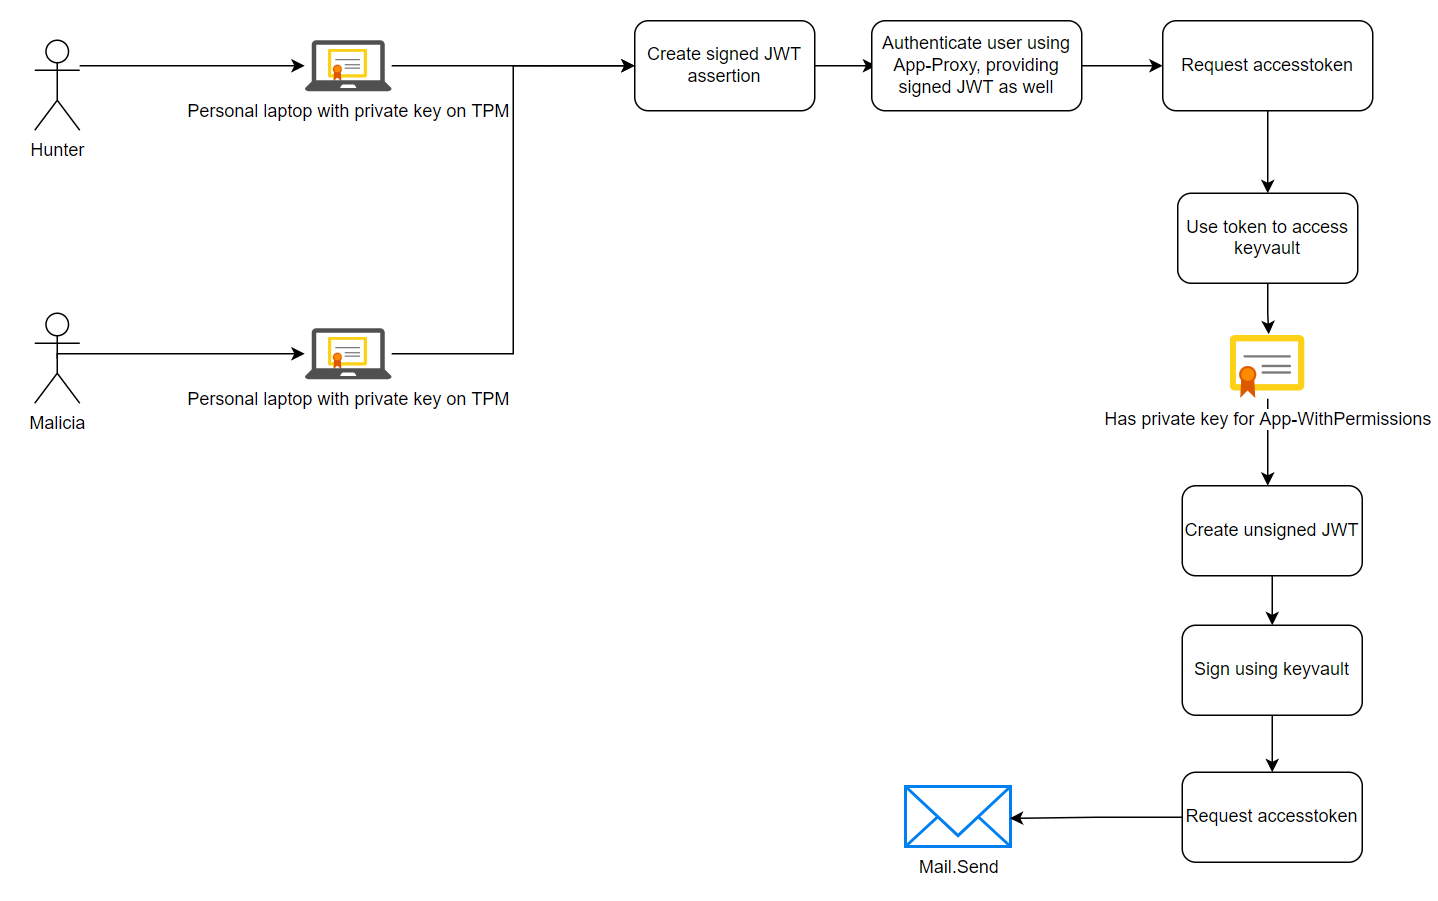
The main difference is that instead of granting these permissions to the application as we did in the previous example, we now select the user account as the principal and configure App-Proxy as the authorized application. That means that in order for Hunter or Malicia to use the sign operation in Azure Key Vault, they must authenticate as well and must have access to the private key of which the public key has been added to the App-Proxy Enterprise Application. Both criteria must be met, otherwise the key operation will fail.
This looks very similar to the previously flow, with the addition of delegated user authentication:
To do this in code:
function Send-Mail ($from, $to, $subject, $htmlbody, $token, $attachmentPath = $null) {
}

function Get-AuthCode ($port = 9999) {
}

function Import-AppCert {
}

function Get-SignedAssertionWithLocalCertificate($clientCertificate, $proxyAppId, $tenantID) {
}

function Get-AccessTokenOnBehalf ($signedJWT, $proxyAppId, $tenantID){
}

function Get-SignedAccessTokenWithAzureKeyVault ($AKVCertificate, $proxyAppToken, $tenantID, $permissionAppID) {
}

function Get-AKVCertificate($kvURI, $proxyAppToken, $keyName) {
}

$proxyAppId      = ''
$permissionAppID = ''
$certThumbprint  = ''
$tenantID        = ''

# URL to keyvault
$kvURI   = 'https://xxx.vault.azure.net'
$keyName = 'App-WithPermission'

# The target audience for the token for Azure Keyvault is different than we'd normally use for MSGraph
$kvScope = 'https://vault.azure.net/.default'

###############################################################################
##           Get a signed assertion using local certificate                   #
###############################################################################
$clientCert = Import-AppCert
$signedJwt  = Get-SignedAssertionWithLocalCertificate -clientCertificate $clientCert -proxyAppId $proxyAppId -tenantID $tenantID

###############################################################################
##        Get an access token using auth code grant flow                      #
###############################################################################
$proxyAccessToken = Get-AccessTokenOnBehalf -signedJWT $signedJwt -proxyAppId $proxyAppId -tenantID $tenantID

###############################################################################
##        Use proxyAccesstoken token to enumerate key vault                   #
###############################################################################
$AKVCertificate = Get-AKVCertificate -kvURI $kvURI -proxyAppToken $proxyAccessToken -keyName $keyName

###############################################################################
##        Get a new access token for App-Permission using the keyvault        #
###############################################################################
$privilegedAccessToken = Get-SignedAccessTokenWithAzureKeyVault -AKVCertificate $AKVCertificate -proxyAppToken $proxyAccessToken -tenantID $tenantID -permissionAppID $permissionAppID

# Send the mail
Send-Mail -MsgFrom 'malicia@pwncorp.org' -to 'hunter@pwncorp.org' -subject 'It works!' -htmlbody 'It works!' -token $privilegedAccessToken
All the examples can be found on our Github page: https://github.com/huntandhackett/accesstokens_are_fun
The benefits of this approach are:
- Accountability in Azure Key Vault;
- The key cannot be exported from the Trusted Platform Module (TPM) within a reasonable timeframe;
- If the laptop is stolen or lost, the private key does not provide access to the key vault since it is only a part of the complete authentication flow;
- If the user account (including MFA) is compromised, access to the keyvault is still safeguarded , since the certificate on the TPM is required for requesting an access token.
- Keep in mind though, that having access (by means of a successful man-in-the-middle attack for example) to sessions cookies and/or tokens, means access is granted to the attacker to every resource the token has access to. This could include the keyvault as well.
Keep in mind that a successful infection on the laptop does not prevent the attacker getting access to the keyvault. If that is the case, call us ;)
Whether or not application permissions, or delegated permissions are better, or more secure depends on the situation and is beyond the scope of this blogpost. However, it could provide a way to restrict and control access to Enterprise Applications with high privileged permissions configured.
Wrapping up
As said in the intro of this blogpost; this blogpost does not really provide a solution for a problem. It is a way of working by utilizing multiple aspects and understanding the key concepts of the techniques used in modern technology. If you are in doubt whether or not you should implement this into your own authentication flow and request all access tokens manually, then simply do not and stick to the supported libraries, such as MSAL.
However, if you are in need of a solution that is not covered by the default libraries and special corner cases are your bread and butter, then maybe this will help in finding a solution that works for you.