Automating your complete Microsoft Entra ID infrastructure deployment may feel like a daunting task when you have already begun manually creating resources. However, automated deployment over ClickOps can deliver your business benefits in terms of security, scalability, reproducibility, and auditability.
In this blog post, we will walk you through a Terraform infrastructure-as-code implementation of Entra ID, together with supporting CI/CD pipelines deploying the infrastructure in two environments. We will be motivating the design choices we make along the way with security in mind.
While your startup may begin with a single system administrator ClickOps-ing their way through the Microsoft Entra ID portal, as your business scales, so too should your approach to cloud infrastructure management. Your single administrator may have your infrastructure under control now, but as you add to your team, you will soon begin to lose scope and insight as to what has been configured in your tenant.
Manually configured infrastructure can be particularly detrimental when considering your approach to disaster recovery. If disaster strikes, will you be able to sift through outdated documentation, recall what you (and those before you) had configured and reprovision all your infrastructure?
When considering security implications, allowing an administrator to singlehandedly and manually make changes to your infrastructure is also problematic. Introducing automation increases the opportunities for making your changes auditable and in compliance with the four-eyes principle. Note also that setting up secure automated pipelines comes with its own challenges, and as with any changes introduced that affect critical architecture, a relevant threat model is needed.
In this blog post, we will share our path towards securing and automating our Microsoft Entra ID infrastructure, with the motivation to stay in control of our infrastructure and grow more resilient in our approach to disaster recovery. Our goal was to provision Entra ID infrastructure using Terraform in 2 different tenants: a tenant with dummy data where we stage and validate all our changes (known hereafter as the test tenant) and a production tenant. This implied setting up our CI/CD deployment such that all infrastructure is first deployed in a test tenant, then upon verification of success, is deployed in production. As the provisioning of Entra infrastructure in production is highly critical, we will be recommending stringent security measures to safeguard the designed pipeline.
By the end of this article, you will also have the tools necessary to automate your Entra ID infrastructure across 2 tenants. This will be done by taking you through the following stages:
- [Stage 1] Setting up the development environment
- [Stage 2] Designing the Entra ID infrastructure-as-code
- [Stage 3] Creating a state file matching the current state
- [Stage 4] Automating infrastructure deployment via CI/CD
Along the way, we will provide links to useful documentation and sample snippets of code. The snippets of code come from the full IaC-EntraID code base on GitHub, which we will link to and reference throughout this blog post.
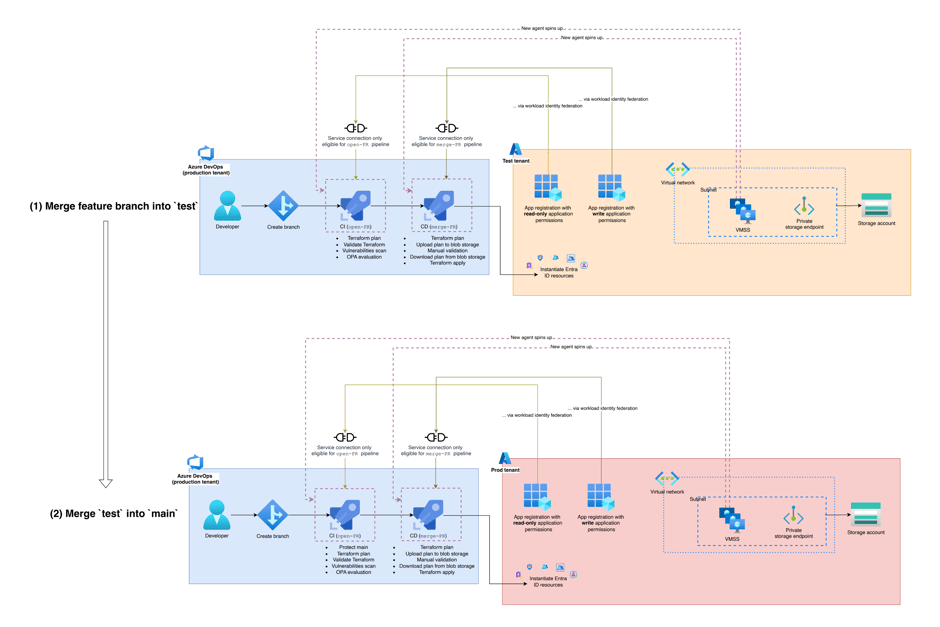
Figure 1. Overview of the supporting architecture.
Stage 1: Setting up the development environment
Let’s start by creating the repositories, resources and authentication identities that our code base will be needing:
- Create Azure DevOps repo: For infrastructure that is being provisioned in Microsoft Entra ID, Microsoft’s Azure DevOps was a natural choice to host our code. We wanted a single source of truth for infrastructure deployed in the test and production tenants, so we chose to use our production tenant to host a single code base.
- Create a resource group: Create identical resource groups in both the test tenant and production tenant in which to store all relevant resources we will be creating for this automation.
- Create storage account: Per tenant, create a storage account with a unique name inside the newly created resource groups. In each storage account, create a container to eventually store the Terraform remote backend (state file), a separate container to eventually store the Terraform plan and another to eventually store an upgrade script. As the Terraform state file is highly sensitive, when creating the storage account, make sure to toggle on infrastructure encryption, versioning and soft delete.
- Create 2 app registrations with client certificate: The code will need to authenticate to our tenant to provision the infrastructure. Create 2 dedicated app registrations with respective client certificates to allow for authentication during local development. One of the app registrations will be used when ‘read-only’ permissions are required, while the other app registration will be used when ‘write’ permissions are required (i.e. `terraform plan` vs. `apply`).
Stage 2: Designing the Entra ID infrastructure-as-code
We now have the necessary backdrop to start writing our code. The Terraform providers `azuread` and `azurerm` cover the creation of the fundamental resources you’ll want to provision in Entra ID, including groups, administrative units, identity governance, conditional access, directory roles, privileged identity management for Azure resources and so on. In this stage, we will be creating the code that describes our existing infrastructure (and maybe any new resources we want to create).
Begin with scoping out the infrastructure you want to provision in Entra ID. Parts of your infrastructure may be Tier 0 (think the ability to assign highly privileged roles), and thus you might consider based on your business, the size of your IT team and amount of infrastructure that you have, whether to separate out the Tier 0 parts of your infrastructure into distinct projects.
Let’s create the code base IaC-EntraID as below in our newly created Azure DevOps repo:
IaC-EntraID/
│ └── scripts/
│ │ └── configure_au_dynamic_membership.py
│ │ └── authentication.py
│ └── modules/
│ │ └── access-packages/
│ │ └── access_packages.tf
│ │ └── variables.tf
└── main.tf
└── provider.tf
└── variables.tf
└── <env_name>.tfvars
└── <env_name>.tfbackend
In our IaC-EntraID repo, we have:
-
provider.tfcontaining the Terraform providers we will be using. You may pass the tenant ID as a variable to the providers in this file, thus… variables.tfcontains the definitions of variables that are configurable between different environments (e.g. tenant ID), and its instantiation per environment is in<env_name>.tfvars.<env_name>.tfbackendcontains the settings you need per remote backend of each environment. This should contain the resource group which hosts the storage account and respective container where your Terraform state file is stored.main.tfcontaining the Entra ID resources we want to instantiate. We have chosen to place all infrastructure in 1 main file. Here we will be defining both resources that already exist in our tenant (which we will later import in) as well as those we want to create (which we will later provision). For repeatable code, we have…modules/which is a directory containing modules and their definitions. Access packages are a good example of code that can be abstracted away into a module, as the creation of each access package has several prerequisites, such as the association of the access package to a catalog, the association of a resource to an access package, the access package policy itself, and so on. Each instantiation of a new access package will thus require several nearly duplicate resources to be defined.scripts/which is a directory containing Python scripts implementing any missing functionality from the Terraform providers. The Terraform providers support creation of the fundamental resources you’ll want to provision in Entra ID but we did find we were still missing some functionality[1]. If you do encounter missing functionality in the providers, you can script the missing pieces with the Microsoft Graph SDK/REST API. We will give an example on how to set this up below.
[1] Feel free to vote on the following issues regarding missing functionality:
Handling missing functionality using Microsoft Graph SDK
One example functionality that the `azuread` provider misses is the configuration of dynamic membership rules for administrative units. While this feature is missing in the Terraform providers, it is available in the Microsoft Graph REST API. Until this feature becomes available in the Terraform providers, we can use the Microsoft Graph SDK for Python to write a Python script to update an administrative unit with dynamic membership, see scripts/configure_au_dynamic_membership.py.
We can then call our Python script in main.tf using an external data source:
# Create AU for guests:
resource "azuread_administrative_unit" "au_guests" {
  display_name              = "Guests"
  description               = "Contains guest users"
  hidden_membership_enabled = false
}

# Configure the dynamic membership of the "Guests" administrative unit
# using an external Python script:
data "external" "py_configure_dyn_membership_guests_au" {
  program = ["python", "${path.cwd}/scripts/configure_au_dynamic_membership.py"]

  query = {
    au_id = azuread_administrative_unit.au_guests.object_id
    au_name = azuread_administrative_unit.au_guests.display_name
    dyn_rule = "(user.userType -eq \"Guest\")"
  }
}

from file: main.tf
The external data resource passes in the relevant parameters that the Python script uses through a query, which is then parsed by the Python script:
import json
import sys

if __name__ == "__main__":
    input_json = json.loads(input)
    au_id = input_json.get('au_id')
    au_name = input_json.get('au_name')
    dyn_rule = input_json.get('dyn_rule')

from file: scripts/configure_au_dynamic_membership.tf
Our motivation for using Python scripts to cover the missing functionality was to ensure we did not have missing pieces in our infrastructure, and the project wasn’t blocked due to the lacking functionality in the provider. Our approach also makes it easy to replace the Python-workarounds whenever the Terraform provider is extended with the missing functionality. When this happens, you can simply remove the Python workaround script and replace the external data block with the newly added Terraform resource.
Stage 3: Creating a state file matching the current state
By the end of the previous stage, we had created the relevant code that describes (and adds to) our Entra ID infrastructure. To instantiate these changes in our test and production tenants, we will be performing local `terraform apply`s per tenant, before we hand over the responsibility of `terraform apply` to the agent running in the CI/CD pipelines. Let’s create a state file per tenant that matches our current state:
- Authentication: Starting with the test tenant, locally authenticate to your Terraform provider using the service principal and client certificate we created in [Stage 1]. For this stage, we can use the service principal that was intended for usage with ‘write’ permissions.
- Terraform initialization: In [Stage 2], we created a file <env_name>.tfbackend that points to the location where we want our remote backed (namely, an Azure storage account and container). Now initialize Terraform for the test tenant using this file: `terraform init -reconfigure -backend-config="<env_name>.tfbackend"` .
- Grant API permissions to app registration: For each resource you defined, reference the Terraform provider documentation and identify the API permissions you will be needing to execute the code. In [Stage 1], we created 2 different app registrations: 1 for ‘read-only’ actions, and the other for ‘write’ actions. For each least-privileged set of permissions required for each resource creation, grant the corresponding ‘write’ API permissions to the app registration intended for ‘write’ usage and the corresponding ‘read-only’ API permissions to the app registration intended for ‘read-only’ usage.
- Local `terraform import`s to import existing infrastructure: In [Stage 2] we created the infrastructure that should exist in our tenant, which will be identical across the test and production tenants. The most ideal but least realistic scenario would have been to start in a brand-new tenant, where you can create from-scratch the necessary resources you need with your Terraform code. More realistically, you probably already have manually created infrastructure in your tenant, and you will want to first import this infrastructure into your Terraform state file, before adding to it. This step is therefore the most tedious one, as you will need to verify the object IDs with which each object exists in your test tenant and manually import them to your state file through `terraform import` statements. Depending on how finicky your configuration is, you might find it handy to comment out the full code base and uncomment out each resource as you manually import them in, one-by-one.
- Local `terraform apply`s to instantiate new infrastructure: After importing existing infrastructure, you can start instantiating any new infrastructure you have added to the codebase. You might also find it convenient to create infrastructure incrementally using Terraform’s `-target` flag. When performing this step, you will use the
<env_name.tfvars>file created in [Stage 2] to resolve environment-specific variables. - Repeat: Once you are happy with your state file, repeat steps 1-5, this time for your production tenant. The code base we created in [Stage 2] should now be responsible for creating identical infrastructure in the test and production tenants.
Stage 4: Automating infrastructure deployment via CI/CD
When you are happy with the infrastructure you have created in your test and production environment after local `terraform import`s and `terraform apply`s, you are now ready to build the automation around it. Our desired workflow via a fully automated CI/CD pipeline is as follows:
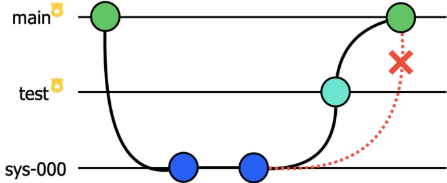
To create a new resource in the production tenant, an engineer will first create a feature branch `sys-000` and commit the relevant code creating this resource. They will merge their feature branch into the protected branch `test` to roll out these changes in the test tenant and verify the behavior of the feature. Only once the feature has been tested in the test tenant will they be able to merge their changes from `test` into `main` to roll out the changes into the production environment. This ensures our test and production environments do not deviate, which is necessary for creating reliable code. Now let’s set up the corresponding CI/CD pipeline:
- Create protected branches for `
test` and `main`: Create two branches in your Azure DevOps repo corresponding to each of the two environments we will be deploying the code in: `test` for the test tenant and `main` for the production tenant. On both branches, create a branch policy requiring a reviewer from the team to review changes on each PR, and requiring a reset of votes when any changes are pushed. This is required to ensure any infrastructure changes are rolled out according to the four-eyes principle. - Create pipelines for
open-PRandmerge-PR: Corresponding to CI and CD respectively, create two pipelines per tenant in Azure DevOps for open-PR and merge-PR. We will elaborate on these pipelines shortly. - Create a service connection in Azure DevOps with workload identity federation: We will continue to leverage the app registrations (with associated API permissions) created for local development, but instead of using a client certificate for authentication, we will now set up workload identity federation for the app registrations in the test and production tenants. To allow our Azure DevOps pipelines to use this form of authentication, we will create four Azure Resource Manager service connections in Azure DevOps (two for each tenant: one for
open-PRand one formerge-PR). The reason for this is to only use a service connection with read-only permissions when making Terraform plans from theopen-PRpipeline, while a service connection with write permissions can be used when performing Terraform applys from themerge-PRpipeline.- To further lock-down the usage of the service connection, we configure pipeline-level permissions. Grant the service connection for the test tenant only the permissions to run the pipelines for
open-PRandmerge-PRcreated for the test tenant. Similarly, we grant the service connection for the production tenant only the permissions to run the pipelines foropen-PRandmerge-PRcreated for the production tenant. This ensures service connections cannot be used by the pipelines they are not intended for. - We add yet another layer of security by configuring approvals and checks for the service connections:
- Setting up branch control settings of the service connection enables you to grant the service connection associated with write permissions for the test tenant only the ability to work with the `
test` branch, and the service connection created for the production tenant only the ability to work with the `main` branch. This is done by setting the allowed branches as ‘refs/heads/main’ for production, and ‘refs/heads/test’ for test. - Decide whether you want to enforce manual approval for a service connection prior to running your pipelines. If so, add a branch control for approvals and set a group who are eligible to review and approve the usage of the service connection. Though this might seem like added manual workload, the service connections for production carry the burden of being highly privileged (depending on whichever API permissions you have granted), so should also be guarded as such.
- Setting up branch control settings of the service connection enables you to grant the service connection associated with write permissions for the test tenant only the ability to work with the `
- To further lock-down the usage of the service connection, we configure pipeline-level permissions. Grant the service connection for the test tenant only the permissions to run the pipelines for
- Create virtual network: Create a new virtual network in each tenant in a dedicated address space with associated subnet and network security group (NSG) in the same resource groups we had created our storage accounts in.
- … with virtual machine scale sets (VMSS) deployed inside: While you can have Microsoft-hosted agents running your pipeline, this has the disadvantage that the agents running in the pipeline must be whitelisted by your storage account if you want them to be able to retrieve the Terraform state file from your secured storage account. For a more robust approach, create your own VMSS agents per tenant – these allow you to be in control of both your network security and your costs. Choosing the smallest possible instance size (
Standard_DS1_v2in our case), and 0 instances allow us to generate 0 costs when the pipeline isn’t being run. Note that while this was a suitable design for our use case where we don’t expect to make changes to our infrastructure every day and thus are not impeded by waiting on an agent to start up, for workloads that run more regularly, you may benefit from having instances on standby. - … with private storage endpoint: We must disable public network access to our storage account as this contains our Terraform state file. To allow for secure access to the storage account, create a private storage endpoint per tenant.
- ... with network security group rule: To further lock down the network and prevent potential unauthorised file distribution, add an outbound NSG ‘deny’ rule for risky remote access ports via TCP (e.g. 22, 3389, 445, 5985-5986, 25). Note that provisioning the agent on the VM requires the machines to reach several Azure DevOps endpoints. If you opt for an allow-list instead of a deny-list approach, this would require maintaining these endpoints on Azure Firewall, which could be an alternate, suitable solution if the costs for Azure Firewall are justified.
- … with virtual machine scale sets (VMSS) deployed inside: While you can have Microsoft-hosted agents running your pipeline, this has the disadvantage that the agents running in the pipeline must be whitelisted by your storage account if you want them to be able to retrieve the Terraform state file from your secured storage account. For a more robust approach, create your own VMSS agents per tenant – these allow you to be in control of both your network security and your costs. Choosing the smallest possible instance size (
- Create VM image for VMSS: To prevent having to install the necessary tools needed by the agent each time the pipeline runs, we need to image a VM, version this, and store it somewhere where we can use it. Besides practical concerns, using a VM image also moves the install of your tools off the pipeline which is possible to malicious exposure, to a controlled process where you decide when to image a VM and with which software variants. Start by creating a private Azure compute gallery. In this gallery, create a VM image definition and image version, situating this in the subnet of the virtual network created in step 4. To image the machine, perform the following:
- Create NSG rule: In the NSG associated with the subnet of the virtual network, create a rule to temporarily allow inbound traffic via port 22. Or even better, instead of manually creating a SSH rule, you can set up JIT VM access.
- Access VM to install tools: SSH into the VM to install Python, Terraform, and any other relevant tools (see script
cicd/vmss-image.sh) ). - Deprovision VM: After all tools have been installed, deprovision the VM to allow it to be used as an image by running:
sudo waagent -deprovision+user -force - Stop the VM.
- Delete the NSG rule created in step a.
- Capture an image: On the VM page, select 'Capture’ → ‘Create an image’.
- Permit the VMSS to use the image: Search for the VMSS from step 4 in the Azure portal. Go to ‘Settings’ → ‘Operating system’ → ‘Change image reference’ → select the latest version of the VM image you created from the Azure compute gallery.
- Cleanup: Now that the VM image has been successfully created, you can delete the resources that were created to provision the VM (i.e. disk, key, NIC etc.)
- Create upgrade script: It is crucial to keep the packages on your VM up to cope with vulnerabilities. In the container of the storage account created in [Stage 1], store a script to upgrade the packages on the VMSS:
- Configure script to launch on VMSS provisioning: To run the upgrade script on every boot of a VMSS instance, search for the VMSS from step 4 in the Azure portal. Go to ‘Settings’ → ‘Extensions + applications’ → + → ‘Custom script for linux’ → select the upgrade script from step i.
#!/bin/bash

for i in {1..3}; do
  apt update -y && break
  sleep 5
done
apt full-upgrade -y
reboot

vmss-upgrade.sh
6. Create an agent pool: To allow Azure DevOps to use the VMSS agents in the pipelines, create an agent pool for the test tenant and the production tenant. For each agent pool, connect it to its service connection in the corresponding tenant, and to the VMSS created in that same tenant. As was done for the service connection, lock-down the usage of the agent pool using pipeline permissions: ensure the agent pool for the test tenant only has permissions to run pipelines open-PR and merge-PR for test, while the agent pipeline for the production tenant only has permissions to run pipelines open-PR and merge-PR for production. To ensure the agents are only running after launch of the pipeline and terminated after, check the “Automatically tear down virtual machines after every use” setting.
We have now created the supporting infrastructure for our code base in two environments: test and production. It is important to recognise that our two environments have no link, peering, or otherwise connection to each other and are separate tenants with their own resources. Our repository is hosted in a production Azure DevOps environment and uses separate service connections (in adherence to the least-privilege principal) to instantiate infrastructure in each tenant. By ensuring the service connections only have the necessary permissions to act on the given pipelines, we prevent their misuse on other repositories in the organisation. Furthermore, our VMSS agents may only access Terraform state files through a private storage endpoint, ensuring the only access to this file is done service-to-service and over a secured, private endpoint.
Creating pipelines for open-PR and merge-PR
Let’s revisit our code base to inspect the new additions:
IAC-EntraID/
│ └── scripts/
│ │ └── configure_au_dynamic_membership.py
│ │ └── authentication.py
│ └── modules/
│ │ └── access-packages/
│ │ └── access_packages.tf
│ │ └── variables.tf
│ └── cicd/
│ │ └── azure-pipelines-mergePR-<env_name>.yml
│ │ └── azure-pipelines-openPR-<env_name>.yml
│ │ └── mergePR-template.yml
│ │ └── openPR-template.yml
│ │ └── variables-template.yml
│ │ └── vmss-image.ssh
└── main.tf
└── provider.tf
└── variables.tf
└── <env_name>.tfvars
└── <env_name>.tfbackend
└── terraform.rego
The most notable addition is the new directory cicd/ which contains the .yml files for our pipelines. The .yml files for open-PR and merge-PR are instantiated for each environment (test and production) via template files (openPR-template.yml and mergePR-template.yml). This is useful for the instantiation of pipelines that are nearly identical. The separate instantiation of open-PR and merge-PR for test and production allows us to create separate build validation policies for each environment. To reiterate, this also allows us to associate separate service connections with each pipeline, ensuring that we only use read-only API permissions when making Terraform plans (in open-PR) and ensuring that the write permissions are only used when performing a Terraform apply (in merge-PR).
Let’s examine the pipeline for open-PR first, in cicd/openPR-template.yml. The core activities being covered in the pipeline boil down to the following:
- Terraform initialisation within the relevant environment (i.e. test or production).
- Terraform validation to scan for syntax errors.
- Creation of Terraform plan in the relevant environment.
- Scanning of vulnerabilities in the `azurerm` provider via Terrascan.
- Launching Open Policy Agent (OPA) evaluation of pre-defined QA rules (more on this shortly).
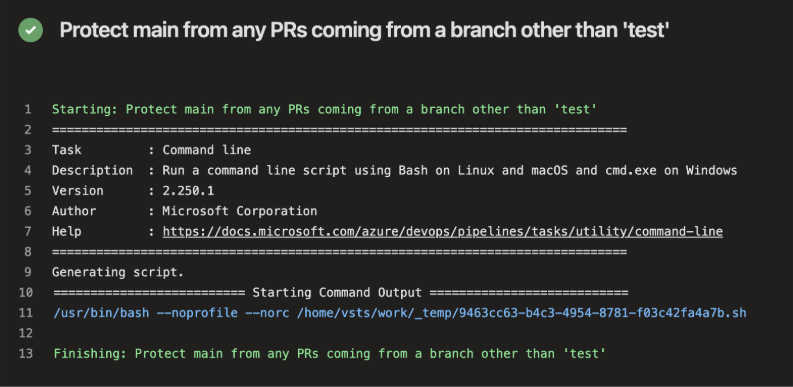
This template is then used by the cicd/azure-pipelines-openPR-test.yml file which sets up the build validation for the test tenant (and thus to PRs that are opened on the `test` branch), and by the cicd/azure-pipelines-openPR-prod.yml file which sets up the build validation for the production tenant (and thus to PRs that are opened on the `main` branch). The authentication to each tenant is done by Azure DevOps service connections that are connected to our app registration via workload federation. Note the one key difference between the aforementioned pipelines is that the production tenant also includes an additional stage `ProtectMain` with the goal to protect `main` from any changes coming from feature branches that are not `test`:
# On main (prod), only allow PRs that have been tested, and thus come from
# the test branch:
- stage: ProtectMain
  jobs:
  - job: protectMain
    pool:
      vmImage: 'ubuntu-latest'
    steps:
    - script: |
        triggeringBranch=$(System.PullRequest.SourceBranch)
        if [ "$triggeringBranch" != "refs/heads/test" ]
        then
          echo "Pull requests to main are only allowed from the 'test' branch. Instead found: $triggeringBranch"
          exit 1
        fi
      displayName: Protect main from any PRs coming from a branch other than 'test'

from file: cicd/azure-pipelines-openPR-prod.yml
While all other stages that interact with our Terraform infrastructure are run on our VMSS agents, this stage can simply run on a Microsoft-hosted agent, as it has no dependancy on network access to our infrastructure.
Earlier, we referred to OPA evaluation of custom QA rules. OPA is useful for ensuring the infrastructure you create abides by rules for design that you want to enforce. In our organization, we would like to prevent new groups being created in Entra ID with the same names. Let’s give a concrete example of how to create such a rule in .rego:
groups_violate_unique_names_principle if {
    i := input.planned_values.root_module.resources[_]  # some ith resource violates our qa if...
    i.type == "azuread_group" # ...it's an azuread group where...
    i.values.prevent_duplicate_names == false # ...we haven't set "prevent_duplicates" to true
}

from file: terraform.rego
This .rego rule is then evaluated against the generated Terraform plan and the script exits prematurely breaking the pipeline if we discover that some group resource in the plan exists whose prevent_duplicate_names property is not set to `true`:
  - script: |
        response=$(opa eval --data terraform.rego --input tfplan.json data.terraform.qa.allow)
        evalRes=$(echo $response | jq '.result[0].expressions[0].value')
        if [ "$evalRes" == "true" ]
        then
            echo “Evaluation against OPA principles sucessful!”
        else
          echo $response | jq '.result'
          exit 1
        fi
      displayName: OPA evaluation of custom QA principles

from file: openPR-template.yml
Terrascan similarly uses .rego rules, and provides an easy-to-use means of evaluating your Azure infrastructure against a set of policies. While it is not so useful yet for the discovery of vulnerabilities in Entra ID infrastructure, we keep this as part of the pipeline in case you do later choose to expand the code base with the creation of Azure infrastructure.
Let’s move onto the pipeline for merge-PR, in cicd/mergePR-template.yml. The core activities of this pipeline boil down to:
- Terraform initialisation within the relevant environment (i.e. test or production).
- Creation of Terraform plan in the relevant environment and uploading to blob storage.
- Waiting for manual validation to roll out the changes (if any exist).
- Perform `terraform apply` using the created plan in the relevant environment.
The manual validation task which is part of the `approveInfraUpdate` job is shown below:
 - job: approveInfraUpdate
    displayName: Approve updating the infrastructure
    dependsOn: planInfraUpdate  # Only ask for manual approval once a Terraform plan is ready for review
    condition: and(succeeded(), eq(dependencies.planInfraUpdate.outputs['terraformPlan.changesPresent'], 'true')) # We only ask for approval when there are infra changes
    pool: server  # The ManualValidation@0 task has to be run agentless
    steps:
    - task: ManualValidation@0
      inputs:
        notifyUsers: |
          <team_distribution_list@domain.com>
        instructions: 'Grant approval for rolling out the changes from the terraform plan in the $(env) environment.'

from file: cicd/azure-pipelines-mergePR.yml
This job is relevant for ensuring that changes are not automatically executed once approved. This can separate the responsibilities of approving a PR, which takes place by a teammate when a PR has been opened, and the actual rollout of the approved changes. Waiting on manual validation might be preferable when you are rolling out high impact changes that should rather be executed e.g. after business hours.
Demonstration
Let’s wrap up with a demonstration of what this new way of working is like. For this, we will walk through one of our actual recent changes.
Business request: At Hunt & Hackett, we use access packages to give our teams the relevant time-boxed access to resources needed for their functions. One such access package allows our SOC to access our SOAR solution with given permissions. A request came in to also allow our Onboarding Technicians to access the SOAR solution with similar permissions. This request entails enabling the Onboarding Technicians to also become eligible requestors to the access package currently used by the SOC to access SOAR with elevated permissions.
Implementation:
1. First, a new branch `ap-onboarding` was created and the changes were committed that would allow Onboarding Technicians to also request the relevant access package:
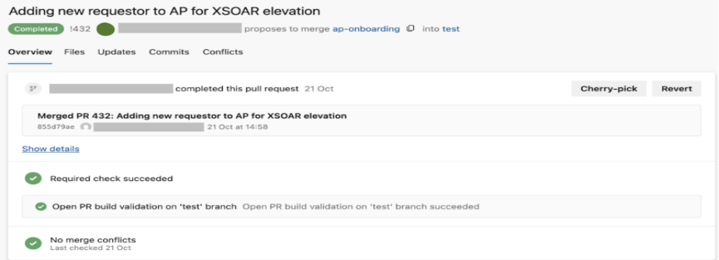
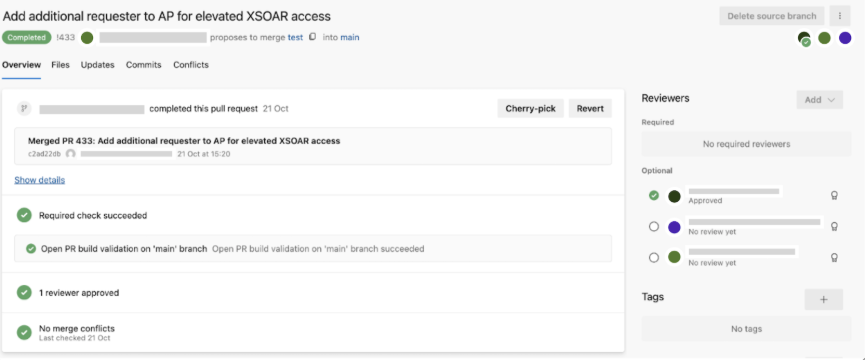
2. Next, a PR on the `test` branch was made from `ap-onboarding` → this PR triggered the open-PR build validation on the `test` branch → a reviewer granted the service connection approval to run the pipeline → once this was successfully completed, the developer was reassured that the code successfully passes syntax validation, vulnerability scans and OPA QA evaluation. The code reviewer then verified the Terraform plan, approved the PR and completed the PR:
3. Completion of the PR automatically triggered the merge-PR pipeline. Before this pipeline was eligible to run, a reviewer granted the service connection approval to run the pipeline. This then triggered the pipeline, successfully merging the changes into the `test` branch:
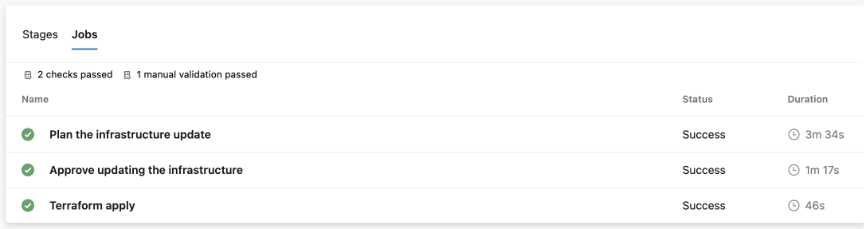
The ‘2 checks passed’ here are: (1) the branch control that ensures the service connection created for the test environment may only be used by the `test’ branch and (2) the manual approval step to verify the service connection is being used by a legitimately-launched pipeline. The ‘1 manual validation passed’ is the approval to go ahead with applying the changes.
4. The developer logged into the test Azure portal tenant with read-only rights and verified the relevant group was added to the access package:

5. Happy with the changes in the test tenant, the developer now can make the same changes in production. A new PR was created on the `main` branch from the `test` branch → a reviewer granted the service connection approval to run the pipeline → this PR generated the open-PR build validation on the `main` branch.
a. The build validation takes the pipeline through two jobs:
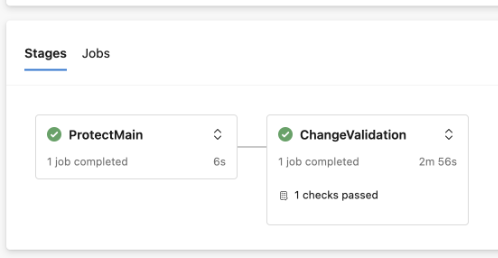
b. In the first job, it is verified that the PR originates from the `test` branch:
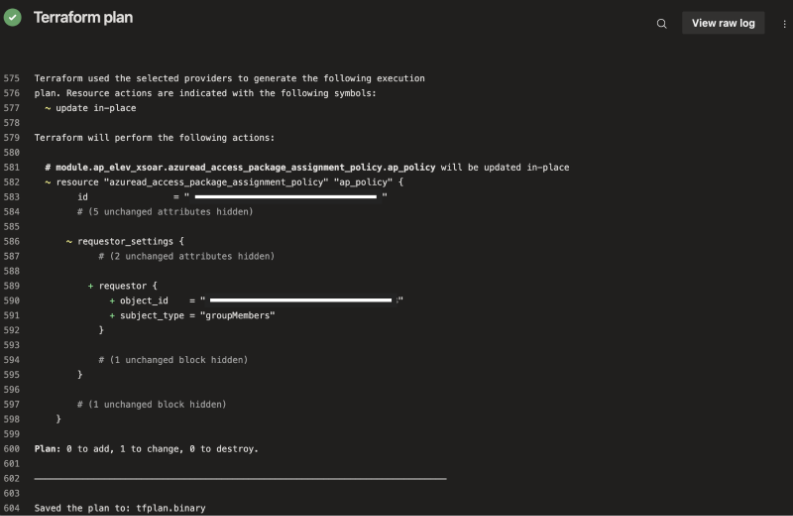
c. As part of one of the tasks in the second job, a Terraform plan is generated. The code reviewer inspected the plan and verified the only change is what was designed (i.e. the addition of a new requestor to the access package) and approved the change:
6. Completion of the PR automatically triggered the merge-PR pipeline, which again, requires a reviewer to verify the pipeline is being run legitimately:

After this check, the developer performed the manual approval step to instantiate the changes. Note that if you require changes to be deployed after working hours, you can hold off on the manual approval until you are ready for instantiation.

7. The changes were rolled out in production:

Conclusion
In this blog post we walked through the stages of automating the deployment of your Entra ID infrastructure as-code. We provided motivations for the design of the infrastructure, and demonstrated how to realise these ideas with a sample code base. By provisioning Entra ID IaC deployed via a CI/CD pipeline, our aim is to maintain a resilient approach to disaster recovery, remain in-control of the infrastructure that we have provisioned, and adhere to the creation of accurate, approved, secure and traceable code. We will wrap up this blogpost with a few closing remarks:
While we set up the client certificate for local authentication to get our Terraform state where we wanted it, this credential should be deleted in your production tenant from its app registration after initial setup. This ensures it is not lying around waiting for a malicious actor to seize an opportunity for its usage. To remain vigilant, generate alerts when a certificate has been created for sensitive app registrations with privileged API permissions. All authentication should occur via the CI/CD pipelines, unless a manual fix needs to be performed. In such cases, you can create a temporary certificate and remove it after use.
On the subject of restricted permissions, ensure to also separate the ability of contributing code to the IaC-EntraID repo (and thus provisioning infrastructure in Entra ID), from the ability to create build validation policies and modify pipelines in Azure DevOps. This is important as our pipelines are protecting the deployment of infrastructure in the tenant, and a single user should not be able to influence this without requiring approval from a teammate. For this, we recommend the use of the Project Collection Administrators group in Azure DevOps for highly privileged users who should be able to modify the pipelines, and the use of the Contributors group for the development team. Ensure the following permissions are denied to the latter group: editing/bypassing/deleting policies, builds, pipelines, managing permissions, force pushes and deleting repositories. If you would like your Contributors to provide manual validation before merging PRs, they will need ‘queue build’ permissions. Furthermore, ensure the project-level Endpoint Administrators and Project Administrators consist only of the highest privileged users, as these groups allow modifications to service connections.
To verify that code changes do come from the devices and users who are eligible to make code changes, have developers sign their commits. You can even take it a step further by verifying that the signed keys come from a preapproved list, though this will require further development to set up as this feature is not yet natively available in Azure DevOps. Hardware-backed signing keys (using either platform managed keys or YubiKeys) would be the ideal configuration for commit signing. Note that SSH authentication using hardware-backed keys is not yet supported by Azure DevOps (feel free to vote here).
As reiterated several times in this blogpost, the highly privileged API permissions that are required to automate your infrastructure deployment are critical to your business. This entails staying alert on logs generated from the relevant resources. Azure’s audit logs will provide you with key insights such as any actions performed by the service principals (e.g. the provisioning of resources) or changes to the service principals (e.g. the adding of API permissions or certificates). Similarly, activity logs can be inspected to view when security rules have been added to NSGs, when the network policy of a storage account has changed or when the items in a storage account have been viewed. Via sign-in logs you can inspect when authentication has occurred with the federated identity credential (with distinction between Python and Terraform code execution). And finally, through Azure DevOps’ auditing logs, changes to branch policies or pipeline security logs can be inspected, and usage history of a service connection is also available. The availability of these logs should be utilised to alert and detect any deviations. Some examples include alerting on ‘list storage account keys’ operations for the storage account containing the Terraform state file initiated by callers that are not the authorised service principal; or alerting on ‘create or update security rule’ of the NSG, informing of potential virtual network exposure.
Deciding to provision your infrastructure as-code requires a change in the way of working. While your system administrators may previously have made manual changes to Entra ID that they hadn’t kept track of, once you manage your infrastructure as-code, we no longer want to enable adhoc changes done outside the CI/CD pipeline. To realise this, we suggest limiting the active Entra ID privileged roles of your system administrators to read-only roles. Permissions that permit a modification in infrastructure should only be granted to users according to the four-eyes principal and where the change is not possible through code, i.e. there is neither the functionality available in the Terraform providers for `azuread`, nor is a workaround possible directly through the Microsoft Graph REST API. And in the cases when an administrator does need to log into the Portal, strengthen their MFA with YubiKeys.